
How to Make the Natures Walk Card
Thank you to Karen Hadler for sharing this.
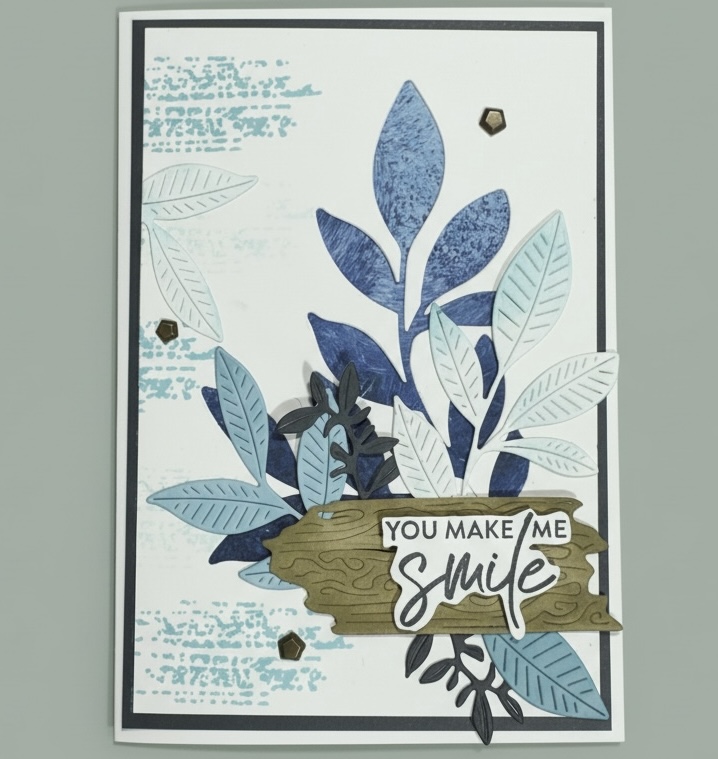
This layered card design uses texture stamping, an aperture feature, and optional die-cut details to create a beautiful finished project. You can keep it simple or step it up with added dimension and embellishments.
Measurements
Card Base
• Basic White Thick Cardstock: 14.8 × 21 cm, score at 10.5 cm
Layers
• Basic White Cardstock (front with aperture & inside): 9.5 × 13.8 cm (x2)
• Night of Navy Cardstock (front & inside): 10 × 14.3 cm (x2)
• Nature Walk DSP (Azure Afternoon / Night of Navy swirl): 9.5 × 13.8 cm
Optional – Step It Up
• Basic White Cardstock (sentiment): 5 × 8 cm
• Balmy Blue Cardstock (large leaves): 14.3 × 10 cm
• Night of Navy Cardstock (small leaves): 5 × 10 cm
• Crumb Cake Cardstock (wood bark): 5 × 10 cm
Instructions
Inside of the Card
1. Fold the card base in half and burnish the fold well.
2. Adhere one Night of Navy cardstock layer to the inside of the card.
3. Take one Basic White layer and stamp the texture image twice in the bottom left-hand corner using Balmy Blue Classic Stampin’ Ink. Do not reink between stamps to achieve two different shades.
4. Stamp the top half of the largest branch image over the same area using Night of Navy ink.
5. Adhere this stamped panel to the inside of the card.
Card Front – Base Layers
6. Adhere the second Night of Navy cardstock layer to the card front.
7. Adhere the Nature Walk DSP layer on top.
8. Die cut the large leaf from the centre of the remaining Basic White cardstock layer to create an aperture.
9. Using the texture stamp and Balmy Blue ink, stamp down the left-hand side of this Basic White layer. Don’t reink every time to create variation in colour.
10. Adhere this stamped aperture layer over the DSP on the card front.
Simple Finish
11. Stamp the sentiment “Thank You” at the top left of the card front using Tuxedo Black Memento Ink.
12. Add Faux Bronze Pentagons to finish, if keeping the card simple.
To Step It Up
13. Die cut the large leaf from Balmy Blue cardstock. Trim the leaves from the left-hand side and adhere to the card front with the larger portion pointing upwards.
14. Die cut the wood bark from Crumb Cake cardstock and lightly blend with Crumb Cake Ink.
15. Add Stampin’ Dimensionals to the back of the wood bark die cut. Take a short length of Secret Sea ⅜” (1 cm) Bordered Open Weave Ribbon, fold into loops, and adhere to the Dimensionals. Attach the wood bark element to the card front.
16. Use the smallest leaf die to cut two sets from Night of Navy cardstock and adhere behind the wood bark element.
17. Take the leaves removed from the Balmy Blue die cut earlier and tuck some of these behind the wood bark element as well.
18. Stamp the sentiment “You Make Me Smile” on Basic White cardstock using Night of Navy ink. Fussy cut with scissors and adhere on top of the wood bark element using Multipurpose Liquid Glue.
19. Add Faux Bronze Pentagons to finish.